2019-07-15: Lab Streaming Layer (LSL) Tutorial for Windows
First of all, I would like to give credit to Matt Gray for
going through the major hassle in figuring out the prerequisites and for the
awesome documentation provided on how to Install and Use Lab Streaming Layer on
Windows.
Christian A. Kothe, one of the developers of LSL, has a YouTube video in which he explains the structure and function of LSL.
Installing Dependencies for LSL: LSL need to be built and installed manually using CMake. We will need a C++ compiler to install LSL. We can use Visual Studio 15 2017 as C++ compiler. In addition to CMake and Visual Studio, it is required to install Git, Qt, and Boost prior to LSL installation. Though Qt and Boost are not required for the core liblsl library, they are required for some of the apps used to connect to the actual devices.
Installing Visual Studio 15.0 2017: Visual Studio can be downloaded and installed from https://visualstudio.microsoft.com/vs/older-downloads/.
You must download Visual Studio 2017 since other versions (including latest 2019) does not work when building some of the dependencies. You can select community version as it is free.
Installing Boost
Boost is a set of C++ libraries which provides additional functionalitis to C++ coding. Boost also needs to be compiled/installed manually. The online instructions for doing this is at https://www.boost.org/doc/libs/1_69_0/more/getting_started/windows.html.
You can download Boost from https://www.boost.org/users/history/version_1_67_0.html. Select the downloaded boost_1_67_0.zip file and extract it directly into your C:\ drive. Then, open a command prompt window and navigate to C:\boost_1_67_0 folder using cd C:\boost_1_67_0 command.


Make a build directory in the labstreaminglayer
folder
\
5. cmake C:\labstreaminglayer -G "Visual Studio 15 2017 Win64"
-DLSL_LSLBOOST_PATH=C:\labstreaminglayer\LSL\liblsl\lslboost
-DQt5_DIR=C:\Qt\5.12.3\msvc2017_64\lib\cmake\Qt5
-DBOOST_ROOT=C:\boost_1_67_0\stage\lib
-DLSLAPPS_LabRecorder=ON
-DLSLAPPS_XDFBrowser=ON
-DLSLAPPS_Examples=ON
-DLSLAPPS_Benchmarks=ON
-DLSLAPPS_BestPracticesGUI=ON

Build (install) lab streaming layer using CMake
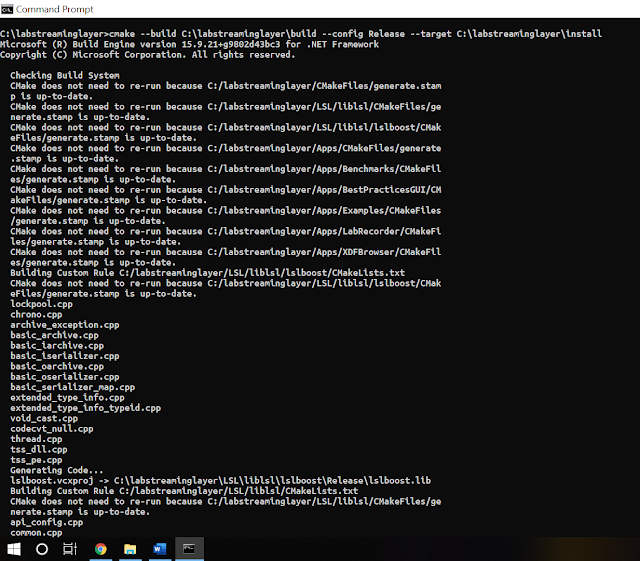
8. cmake --build C:\labstreaminglayer\build --config Release --target C:\labstreaminglayer\install
Now, that the LSL installation is complete, we will have a look at the LabRecorder. Labrecorder is the main LSL program to interact with all the streams. You can find the LabRecorder program at C:\labstreaminglayer\install\LabRecorder\ LabRecorder.exe.
The interface of LabRecorder looks like following.
Installing PupilLabs LSL connection: There are many devices which could be connected with LSL. Muse EEG device, Emotive Epoc EEG device, and PupiLabs core eye tracker are some of them. The example below shows how to use PupilLabs core eye tracker with LSL for streaming data to NeuroPype.

Connect PupilLabs with LSL: Build liblsl-Python in a Python or Anaconda Prompt. You could do with your command prompt as well. Execute following commands:
1. cd C:\labstreaminglayer\LSL\liblsl-Python
2. python setup.py build
Then, you have to install LSL as plugin in Pupil Capture program.
If the pylsl folder
does not have lib folder containing liblsl64.dll, there is a
problem with pylsl build. As an alternative approach, install pylsl via
pip by running pip3 install pylsl command in command prompt. Make sure you have installed pip in your computer prior running these commands in your command prompt. You can use pip3 show pylsl
command to see where is the pylsl module built in your compute. This module will
include the pre-built library files. Copy this newly created pylsl module to the C:\Users\<user_profile>\pupil_capture_settings\plugins
folder.
In this example, pylsl module was installed in C:\Users\<user_profile>\AppData\Local\Python\Python37\Lib\site-packages\pylsl folder. It includes a lib folder which contains
As the next step, launch
pupil_capture.exe and enable Pupil
LSL Relay from Plugin manager in Pupil Capture – World window.
Now when you hit the R button on the left of World window, you start recording from PupilLabs while streaming it to the LSL. In Labrecorder, you could see the streams in green color (see Figure LabRecorder interface when PupilLabs is streaming).
Now, let's have a look at how to get data from LSL to Neuropype.
Getting Started with Neuropype and Pipeline Designer:
 Before launching Neuropype Pipeline Designer, make sure that NeuroPype Server is running on background. If not, you can run it by double clicking on NeuroPype Academic icon. You can set to launch NeuroPype server on startup as well.

Create an Example Pipeline: Select LSL Input node in Network (green) section, Dejitter Timestamp in Utilities section (light blue), Assign Channel Locations in Source Localization section (Pink), Print To Console in Diagnostics section (pink) from widget panel.
In this blog, I will guide you how to install open source Lab Stream Layer (LSL) and stream data (eye tracking example using PupilLabs eye tracker) to NeuroPype Academic edition. Though a basic version of LSL is available along with NeuroPype, you will still need to complete following prerequisites before installing LSL.
You can find installation instructions for LSL at https://github.com/sccn/labstreaminglayer/blob/master/doc/BUILD.md. The intention of this blog is to provide an easier and more streamlined step-by-step guide for installing LSL and NeuroPype.
LSL is low-level technology for exchange of time series between
programs and computers. |
Figure: LSL core components Source: ftp://sccn.ucsd.edu/pub/bcilab/lectures/Demo_1_The_Lab_Streaming_Layer.pdf |
Christian A. Kothe, one of the developers of LSL, has a YouTube video in which he explains the structure and function of LSL.
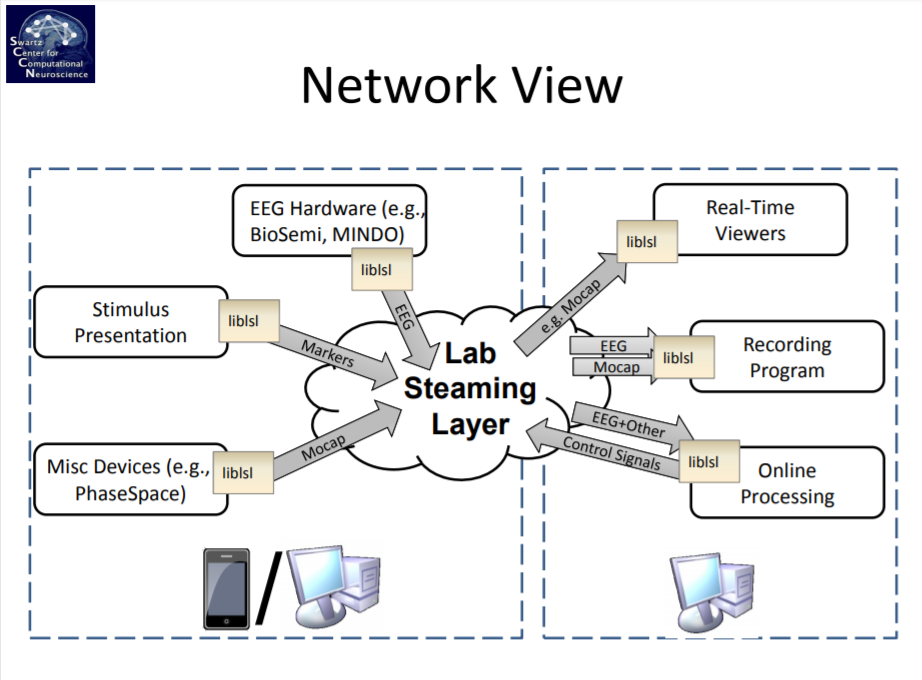 |
| Figure: LSL network overview Source: ftp://sccn.ucsd.edu/pub/bcilab/lectures/Demo_1_The_Lab_Streaming_Layer.pdf |
 |
| VS version - 2017 |
The installation process will ask which Workloads you
want to install additionally. Select the following Workloads to install.
1. .NET
desktop development
2. Desktop
development with C++
3. Universal
Windows Platform development
 |
| Figure: Workloads need to be installed additionally |
Installing Git: Git is open source distributed version control system. We will use Git to download the LSL Git repository. Download Git for Windows from https://git-scm.com/download/win. Continue the installation with default settings except feel free to choose your own default text editor (vim, notepad++, sublime, etc) to use with git.In addition, when encountered Adjust your PATH environment page, make sure to choose the Git from the command line and also from 3rd-party software option in order to execute git commands using command prompt, python prompts, and other third party software.
Installing CMake:
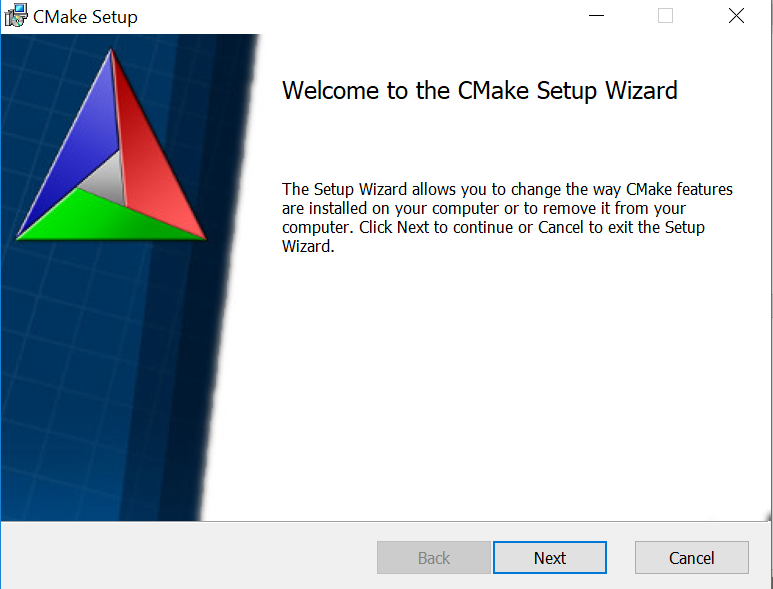 |
| Figure: First interface of CMake Installer |
CMake is a program for building/installing other programs
onto an OS.
You can download CMake from https://cmake.org/download/. Choose the cmake-3.14.3-win64-x64.msi
file to download under Binary distributions.
When installing, feel free to choose the default selections, except, when prompted, choose
Add CMake to the system PATH for all users.
Installing Qt:
Qt is a GUI generation program mostly used to create user interfaces. Some of the LSL apps use this to create user interfaces for the end user to interact with when connecting to the device.
Qt is a GUI generation program mostly used to create user interfaces. Some of the LSL apps use this to create user interfaces for the end user to interact with when connecting to the device.
Open-source version can be downloaded and installed from https://www.qt.io/download. An executable
installer for Qt is provided so installing should be easy.
You will be asked to enter details of a Qt account in the install wizard. You can either create or log in if you
have an account already.
 |
| Figure: Qt Account creation step |
- During the installation process, select defaults for all options except in the Select Components page, select the following to install:
o Under Qt 5.12.3:
§
MSVC 2017 64-bit
§
MinGW 7.3.0 64-bit
§
UWP ARMv7 (MSVC 2017)
§
UWP x64 (MSVC 2017)
§
UWP x86 (MSVC 2017)
 |
| Figure: Select Components to be installed in Qt |
The directory that you need for installing LSL is C:\Qt\5.12.3\msvc2017_64\lib\cmake\Qt5
Boost is a set of C++ libraries which provides additional functionalitis to C++ coding. Boost also needs to be compiled/installed manually. The online instructions for doing this is at https://www.boost.org/doc/libs/1_69_0/more/getting_started/windows.html.
You can download Boost from https://www.boost.org/users/history/version_1_67_0.html. Select the downloaded boost_1_67_0.zip file and extract it directly into your C:\ drive. Then, open a command prompt window and navigate to C:\boost_1_67_0 folder using cd C:\boost_1_67_0 command.
Then execute
1. bootstrap
2. .\b2
commands one after the other.
1. bootstrap
2. .\b2
commands one after the other.
 |
| Figure: Executing bootstrap and .\b2 commands |
 |
| Figure: After Executing bootstrap and .\b2 commands |
The directory that you need for
installing LSL is C:\boost_1_67_0\stage\lib
In a command prompt, execute following commands.

1. cd C:\
2. git clone https://github.com/sccn/labstreaminglayer.git --recursive

3. cd labstreaminglayer
4. mkdir build && cd build

5. cmake C:\labstreaminglayer -G "Visual Studio 15 2017 Win64"
-DLSL_LSLBOOST_PATH=C:\labstreaminglayer\LSL\liblsl\lslboost
-DQt5_DIR=C:\Qt\5.12.3\msvc2017_64\lib\cmake\Qt5
-DBOOST_ROOT=C:\boost_1_67_0\stage\lib
-DLSLAPPS_LabRecorder=ON
-DLSLAPPS_XDFBrowser=ON
-DLSLAPPS_Examples=ON
-DLSLAPPS_Benchmarks=ON
-DLSLAPPS_BestPracticesGUI=ON
The above command configures LSL, defines which
Apps are installed, and tell LSL where the Qt, Boost, and other dependencies
are installed.
i. C:\labstreaminglayer is the path to the lab streaming layer root directory (where you cloned LSL from Gihub)
ii. The
–G command defines the compiler used to compile LSL ( We use Visual Studio 15 2017 Win64)
iii. –D
is the command for additional options.
1. –DLSL_LSLBOOST_PATH
à
Path to the LSL Boost directory
2. –DQt5_DIR
à
Path to Qt cmake files
3. –DBOOST_ROOT
à
Path to installed boost libraries
4. –DLSLAPPS_<App Name>=ON à These are the Apps
located in the Apps folder (C:\labstreaminglayer\Apps) that you want installed.
Just add the name of the folder within the Apps folder that you want installed
directly after –DLSLAPPS_ with no spaces

6. cd ..
7. mkdir install


Now, that the LSL installation is complete, we will have a look at the LabRecorder. Labrecorder is the main LSL program to interact with all the streams. You can find the LabRecorder program at C:\labstreaminglayer\install\LabRecorder\ LabRecorder.exe.
The interface of LabRecorder looks like following.
 |
| Figure: LabRecorder interface when PupilLabs is streaming |
The green color check box entries below Record from Streams are the PupilLabs’(eye tracking device) streams. When all programs are installed and running for each
respective device, the devices’ streams will appear as above under Record from Streams.You can check your required data
stream from the devices listed, then just press Start to begin data recording from all the devices. The value under Saving to on
the right specify where the data files (in XDF format) will be saved.
Installing PupilLabs LSL connection: There are many devices which could be connected with LSL. Muse EEG device, Emotive Epoc EEG device, and PupiLabs core eye tracker are some of them. The example below shows how to use PupilLabs core eye tracker with LSL for streaming data to NeuroPype.

Let us first begin with Setting Up PupilLabs core eye tracker. You can find instructions for using and developing with PupilLabs here. I’ll provide some steps to setup everything from start to finish to work with LSL below though. The LSL install instructions for PupilLabs is at https://github.com/labstreaminglayer/App-PupilLabs/tree/9c7223c8e4b8298702e4df614e7a1e6526716bcc.
To setup PupilLabs Eyetracker, first you have to download PupilLabs software from https://github.com/pupil-labs/pupil/releases/tag/v1.11. You can go ahead and choose pupil_v1.11-4-gb8870a2_windows_x64.7z file and unzip it into your C:\ drive. You may need 7z unzip program for unzipping. Then, you just have to plug in the PupilLabs eye tracker to your computer. It will automatically begin to install drivers for the hardware.
After that, you can run the Pupil Capture program located at: C:\pupil_v1.11-4-gb8870a2_windows_x64\pupil_capture_windows_x64_v1.11-4-gb8870a2\pupil_capture.exe with Administrative Privileges so that it can install the necessary drivers. Next, you can follow the instructions in https://docs.pupil-labs.com/ to setup, calibrate, and use the eye tracker with the Pupil Capture program.
Connect PupilLabs with LSL: Build liblsl-Python in a Python or Anaconda Prompt. You could do with your command prompt as well. Execute following commands:
1. cd C:\labstreaminglayer\LSL\liblsl-Python
2. python setup.py build
Then, you have to install LSL as plugin in Pupil Capture program.
a. In
the newly created C:\labstreaminglayer\LSL\liblsl-Python\build\lib
folder, copy the pylsl folder and all
its contents into the C:\Users\<user_profile>\pupil_capture_settings\plugins
folder (replace <user_profile> with your Windows user profile).
b. In
the C:\labstreaminglayer\Apps\PupilLabs
folder, copy pupil_lsl_relay.py into
the C:\Users\<user_profile>\pupil_capture_settings\plugins
folder.
 |
| Figure: Original Location of pupil_lsl_relay.py |
 |
Figure: After copying pupil_lsl_relay.py and pylsl folder into C:\Users\<user_profile>\pupil_capture_settings\plugins folder |
In this example, pylsl module was installed in C:\Users\<user_profile>\AppData\Local\Python\Python37\Lib\site-packages\pylsl folder. It includes a lib folder which contains
 |
| Figure: pylsl module's installation location when used pip3 install pylsl command |
 |
| Figure: Enabled Pupil LSL Realy from Plugin Manager |
Now, let's have a look at how to get data from LSL to Neuropype.
Getting Started with Neuropype and Pipeline Designer:
First, you have to download and install the NeuroPype
Academic Edition (neuropype-suite-academic-edition-2017.3.2.exe) from https://www.neuropype.io/academic-edition. The NeuroPype Academic Edition includes a Pipeline Designer
application, which you can use to design, edit, and execute NeuroPype pipelines
using a visual ‘drag-and-drop’ interface.
 Before launching Neuropype Pipeline Designer, make sure that NeuroPype Server is running on background. If not, you can run it by double clicking on NeuroPype Academic icon. You can set to launch NeuroPype server on startup as well.
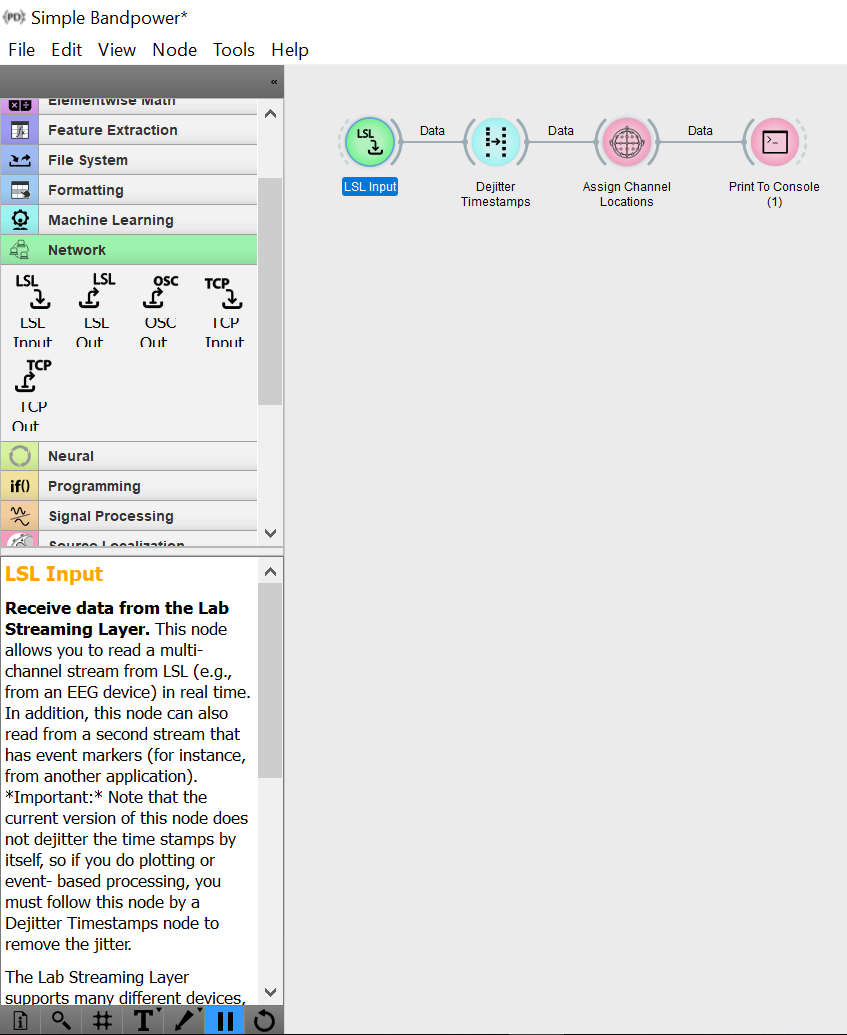
The large white area in the following screenshot is the ‘canvas’
that shows your current pipeline, which you can edit using drag-and-drop and
double-click actions. On the left you have the widget panel, which has all the
available widgets or nodes that you can drag onto the canvas.

Create an Example Pipeline: Select LSL Input node in Network (green) section, Dejitter Timestamp in Utilities section (light blue), Assign Channel Locations in Source Localization section (Pink), Print To Console in Diagnostics section (pink) from widget panel.
Canvas looks like Fig. Pipeline created in Neuropype after creating the pipeline.
After getting the nodes to the canvas, you can connect them using the dashed
curved lines on both sides of them. Double click on either of the dashed line
of one node and drag the connecting line to a dashed curved line of the other
node. It will create a connection between two nodes named Data.
You can hover the mouse over any section or widget or click
on a widget on canvas and see a tooltip that briefly summarizes it.
 |
| Figure: Pipeline created in Neuropype |
Start Processing
LSL is not only a way to get data from one computer to
another, but also to get data from your EEG system, or any other kind of sensor
that supports it, into NeuroPype. You can also use it to get data out of
NeuroPype into external real-time visualizations, stimulus presentation
software, and so on.
Make sure that the LSL Input node has a query string that
matches that sensor. For instance, if you use PupilLabs, you need to enter type=’Pupil Capture’ as below. Then NeuroPype will pick up data from the PupilLabs eye tracker.
 |
| Figure: Set up type of LSL Input |
To launch the current patch, click the BLUE pause icon in the toolbar (initially engaged) to unpause it. As a result, the Pipeline Designer will ask the NeuroPype server to start executing your pipeline. This will print some output.
Congratulations! You successfully set up LSL, PupilLabs and NeuroPype Academic version. Go ahead and experiment with your EEG system, or any other kind of sensor that supports LSL and NeuroPype.
Feel free to tweet @Gavindya2 if you have any questions about this tutorial or need any help with your installation.
--Gavindya Jayawardena (@Gavindya2)
Feel free to tweet @Gavindya2 if you have any questions about this tutorial or need any help with your installation.
--Gavindya Jayawardena (@Gavindya2)
This comment has been removed by the author.
ReplyDeleteHi,
ReplyDeleteI have 2 issues:
1. How do I execute the following codes ? I cannot do it in cmd
cmake C:\labstreaminglayer -G "Visual Studio 15 2017 Win64"
-DLSL_LSLBOOST_PATH=C:\labstreaminglayer\LSL\liblsl\lslboost
-DQt5_DIR=C:\Qt\5.12.3\msvc2017_64\lib\cmake\Qt5
-DBOOST_ROOT=C:\boost_1_67_0\stage\lib
-DLSLAPPS_LabRecorder=ON
-DLSLAPPS_XDFBrowser=ON
-DLSLAPPS_Examples=ON
-DLSLAPPS_Benchmarks=ON
-DLSLAPPS_BestPracticesGUI=ON
2. When I tried to execute this command
cmake --build C:\labstreaminglayer\build --config Release --target C:\labstreaminglayer\install
It gave me this error
Microsoft (R) Build Engine version 15.9.21+g9802d43bc3 for .NET Framework
Copyright (C) Microsoft Corporation. All rights reserved.
MSBUILD : error MSB1009: Project file does not exist.
Switch: C:\labstreaminglayer\install.vcxproj.vcxproj
Thanks for your helpful tutorial
The error is missing path to MSBuild.exe . The possible solution is to install MSBuild.exe or run cmake from MSBuild.exe's location.
ReplyDeleteRelated solutions could be found in: https://stackoverflow.com/questions/44478492/cmake-failed-to-run-msbuild-command-msbuild-exe
Hello Gavindya. Excuse me, do you know how to fix this error? Could you tell me how please?
DeleteHello Gavindya. I have the same error. Do you know how to fix it? the answer of the blog, It didnt work for me. Thank u
DeleteHi, we've had a couple LSL users who found this blog post but were unable to follow these instructions. It turns out that these instructions for the LSL + LabRecorder part are unnecessary for most users. Just download the pre-compiled builds: https://github.com/labstreaminglayer/App-LabRecorder/releases
ReplyDeleteThe official LSL documentation is located at https://labstreaminglayer.readthedocs.io/
Hello, I get an error at step 5:
ReplyDeleteC:\labstreaminglayer> -DLSL_LSLBOOST_PATH=C:\labstreaminglayer\LSL\liblsl\lslboost
'-DLSL_LSLBOOST_PATH' is not recognized as an internal or external command,
operable program or batch file.
How can I solve it? Everything went smoothly up to that point but none of the codes starting with a "-" works. Thank you.
@turkan , step 5 is all one command, not different commands on each line.
ReplyDeleteBut ignore that and read the comment above yours.
Tried many times to build all apps at once. If anyone is unable to build the apps using the above guide you can go to any sub-module of LabStreamingLayer repo and download the latest release.
ReplyDeleteFor example, AudioCapture repo: https://github.com/labstreaminglayer/App-AudioCapture/tree/a527e0966f26ca3c629e9b2095e4e5d557e4000a , has release at https://github.com/labstreaminglayer/App-AudioCapture/releases